A new 5″ variant of Raspberry Pi Touch Display 2
14. November 2025 | Planegg
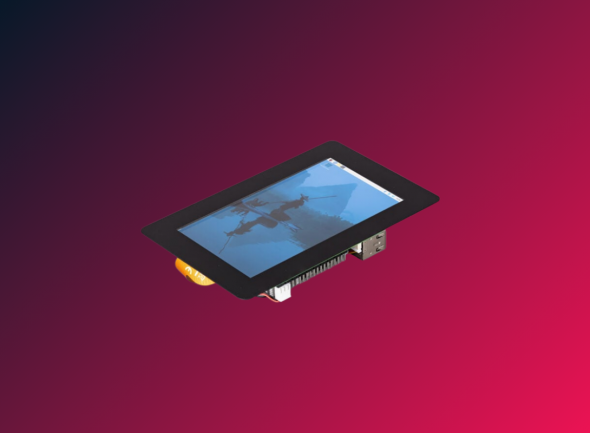
Last year we launched the refreshed 7″ Raspberry Pi Touch Display 2 as a successor to our original 2015 Touch Display, offering a simplified form factor and higher 720×1280-pixel resolution at the same $60 price point. Today we’re excited to announce a new 5″ variant, available to buy now from Raspberry Pi Approved Resellers. It shares the same resolution and easy setup as the 7″ variant, at the low price of $40.
WICHTIGE MERKMALE
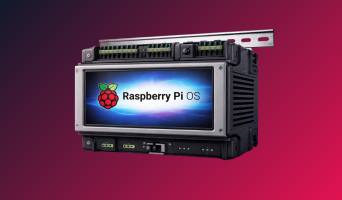
Except for its size, the specification of the new 5″ variant is almost identical to that of its bigger sibling:
- 5″ diagonal display
- 62mm × 110mm active area
- 720 (RGB) × 1280 pixels
- True multi-touch capacitive panel, supporting five-finger touch
- Fully supported by Raspberry Pi OS
- Powered from the host Raspberry Pi
- All necessary cables, connectors, and mounting hardware included
A PLUG-AND-PLAY MULTI-TOUCH DISPLAY
What makes Raspberry Pi Touch Display 2 particularly appealing is its seamless integration with the rest of the Raspberry Pi product ecosystem.
Its capacitive touch screen works out of the box with full Linux driver support – no manual calibration required, no hunting through device trees, and no wrestling with incompatible touch controllers. Connect it to your Raspberry Pi (our installation guide shows you how, including connecting to the Raspberry Pi’s standard 5V GPIO supply for power), and you have a fully functional multi-touch display that just works. Now you can concentrate on your project instead of hardware hassles.
To illustrate our new 5″ display’s capabilities, I decided to create a simple slideshow application using AI-assisted development. This seemed like a perfect opportunity to explore and demonstrate both the hardware’s multi-touch features and modern development workflows.
DEVELOPING CODE WITH AI
Not everyone thinks AI is the future of software engineering, but I find it important to understand how technology advances, so this year I’ve been dipping my hand into coding with AI. To give you an idea of how easy this is, I thought I’d share all the prompts I gave to Cursor (using the Claude Sonnet 4 model) to develop a very simple slideshow application for the 5″ variant of Raspberry Pi Touch Display 2.
You can see the prompts I used to drive the model in the italicised text below. After each prompt or set of prompts, I’ve included some notes about why I used them and how effective they were at getting me closer to the result I wanted.
A BRIEF FOR A TOUCH DISPLAY SLIDESHOW APPLICATION
I began by giving the AI a high-level, but quite specific, brief:
I would like to create a simple application running on the Raspberry Pi remote device which has a touch panel attached. The application should display images from a local directory as a slideshow. Touching the display should stop the slideshow and allow the user to manipulate the position and be able to zoom in using standard gestures
This gave a working and usable application, but zooming and panning didn’t work. It seemed only to support a single touch. This is because of some of the choices made by the compositor to convert touches into mouse click or doubleclick events (the compositor does this so the touchscreen works with the UI correctly).